A Deep Dive into Essential White Cane Skills: Constant Contact vs. Two Point Touch
Oct 07, 2025
As an Orientation and Mobility (O&M) specialist, my work centers on teaching individuals how to interpret their environment and travel safely and independently. The primary tool often used for this is the
The Framework for Mobility: The Expanded Core Curriculum
Protection: The cane's primary safety function is to detect obstacles before the body does, preventing collisions and falls.Information: The feedback from the cane's tip allows the user to perceive surface changes, identify drop-offs like curbs and stairs, and understand the surrounding terrain.Efficiency: With reliable environmental information and protection, a user can travel more quickly and with greater confidence.
Understanding Constant Contact
Constant Contact is exactly what it sounds like: the tip of the cane remains in constant contact with the ground, gliding smoothly from side to side in a sweeping motion.
The learner glides the cane back and forth in a continuous arc, ensuring the tip is always touching the ground. This creates an uninterrupted feedback of the surface ahead. The gliding motion provides a rich, detailed stream of tactile and auditory information about the path.
Beginners: Its continuous feedback is less mentally taxing and helps build a strong conceptual map of the environment.Complex Environments: When navigating unfamiliar or cluttered areas, the constant feedback is invaluable for detecting subtle changes and hazards.Slower Travel: It’s ideal for users who are moving at a walking pace and need to process a lot of environmental information.
The MVP of the AFB Style Cane is the tip. The most common and effective is the
How to Execute Constant Contact Correctly:
Grip and Position: The hand holds the cane in a handshake grip, centered in front of the body at themidline position . The arm should be extended but slightly bent and relaxed.The Arc Width: The cane is swept from side to side, covering a path that is slightly wider than the learner's shoulders. A common mistake is creating an arc that is too wide or too narrow. The goal is to clear the space your body will occupy.Rhythm and Movement: The cane's movement is synchronized with the learner's steps. The cane glides to the left as the right foot steps forward, and to the right as the left foot steps forward. This is called "In Step" which makescontralateral movement and ensures the space is clear before the foot lands there.
Mastering the Two Point Touch
Instead of a constant glide, the user taps the cane on the ground at the two endpoints of their arc. It’s a rhythmic tap-tap-tap that corresponds with their footsteps, clearing the path ahead.
Skilled Users: It requires a higher level of spatial awareness and confidence, as the user is "filling in the gaps" between the taps.Faster Travel: This technique is lighter on the wrist and allows for a quicker pace, making it perfect for long, clear stretches like sidewalks or hallways.Familiar Environments: When a user already knows a route well, they don’t need the constant stream of information and can rely on the taps to detect unexpected obstacles.
Lighter: Often made of fiberglass or carbon fiber, making them easy to lift and tap for extended periods.Longer: They are typically measured to reach the user's chin or even nose, providing more warning time for obstacles when moving at a faster pace.Rigid with a Metal Tip: They are not meant to flex, and the small, hard metal tip provides crisp, clear auditory feedback when it strikes the pavement.
Position: The grip and midline starting position are the same as Constant Contact.The Tap: As the right foot steps forward, the cane taps the ground on the left side of the body. As the left foot steps forward, the cane taps on the right.Staying In-Step: This contralateral rhythm is non-negotiable for safety. The tap must clear the space just before the opposite foot enters it.
A 20% accuracy in cane technique can correlate to only 20% safety, consistency is key.
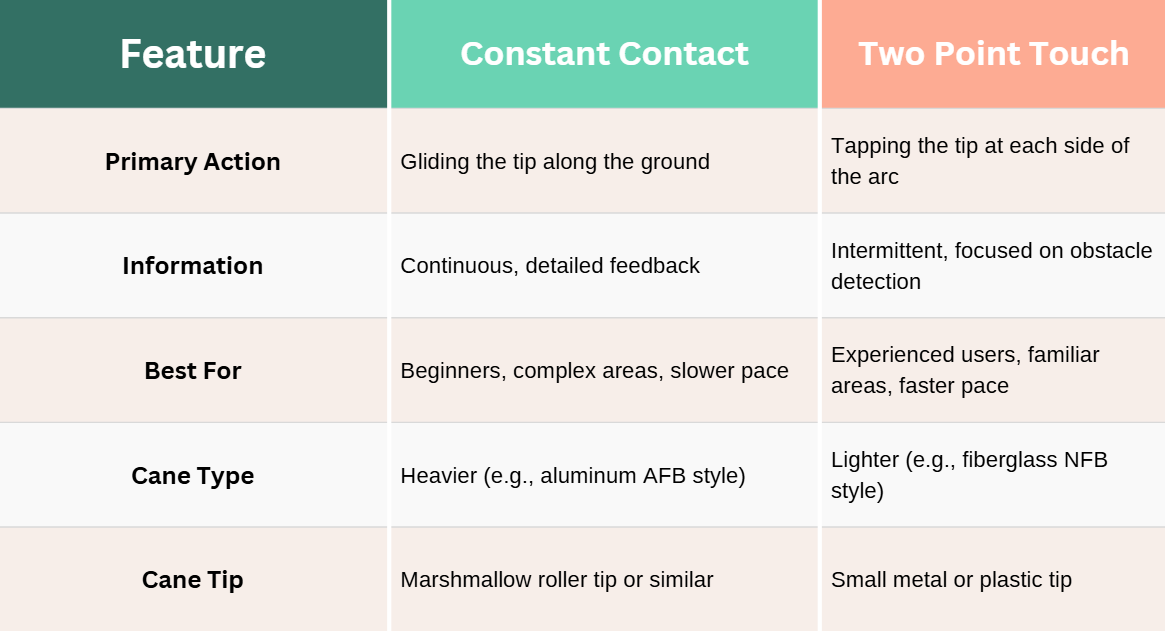
At a Glance: Constant Contact vs. Two Point Touch

Adapting for All Learners
Choosing the Right Skill for the Journey
It’s not a question of which technique is better, but which one is right for the moment. A skilled cane user might use Two Point Touch to walk quickly down a familiar sidewalk, then immediately switch to Constant Contact to get more detailed information about a busy intersection they need to cross. The choice always depends on three things: the user’s experience, the environment they are in, and what they are trying to accomplish.
A proficient traveler knows exactly which tool to pull out at the right time. For educators and family members, understanding what’s in this toolbox is key. When you appreciate the level of focus and skill required for each technique, you become a more effective advocate and a vital part of a student’s team on their path to independence.
Related Articles:
- When to Give a Learner with Multiple Impairments a Cane?
- Easy White Cane Day Activity Ideas (Both Virtual and In-Person)
- 3 Intermediate Mobility Strategies Every O&M Specialists Must Know
topics covered: cane skills, constant contact, two point touch, white cane, orientation and mobility, constant contact vs two point touch, types of cane skills, visual impairment education, teaching students with visual impairments, expanded core curriculum, O&M specialist resources, AFB style cane, NFB style cane, how to use a white cane, orientation and mobility for children, types of white canes

